Manual
Tags 1 Manual
Table of Contents
Introduction
Tags is an app that allows you to manage all your files so that you can easily find the files that you need, when you need them.
Tag everything on your Mac: documents, emails, images. Quickly find files irrespective of where you saved them. You can bring up the Tag's UI with a simple keystroke in most applications, so that you can Tag files and search for Tags, wherever you are.
Tags are like keywords for files. Using tags allows you to group files which have something in common. You can apply many different Tags to a single file as well as apply the same Tag to multiple files. This allows you to associate files to one another in a way far superior to a rigid file / folder structure.
Getting Started
The Keyboard Shortcut CONTROL + SPACE will launch Tags in Tag Mode, if you press the Keyboard shortcut again it will switch to Search Mode.
Tag Mode allows you to quickly tag files with keywords. You can either type your tags, or select the tag buttons to tag a file. Tags will try to automatically determine the file that you are currently working on, or the file(s) you have selected. Tags will be able to determine which file you are working on in most applications, if the application happens to be unsupported, you can always go ahead and tag the file in Finder. Alternatively you can drag and drop files, emails and bookmarks onto the yellow Tag window to select them for tagging.
Search Mode allows you to quickly find files based on tags. You can always use Spotlight or in Application Search, but Search Mode is the fastest way. Simply type in the tags you are looking for, and results window will immediately start to be populated with results.
Tagging your first file
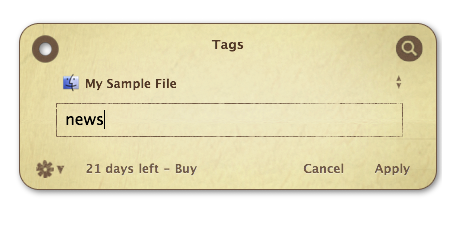
1. Select a file or folder in Finder
2. Press the Keyboard Shortcut CONTROL + SPACE in order to open the the yellow Tag Mode window.
=> The yellow Tag Mode window will open and the name of the File will be shown.
=> Alternatively you can drag and drop a file, email or bookmark onto the yellow Tag window to select it for tagging.
3. Start entering a tag that you want to apply. e.g.: "news".
4. Press the Apply button (or press return) to apply and close the window
Searching for your Tagged File
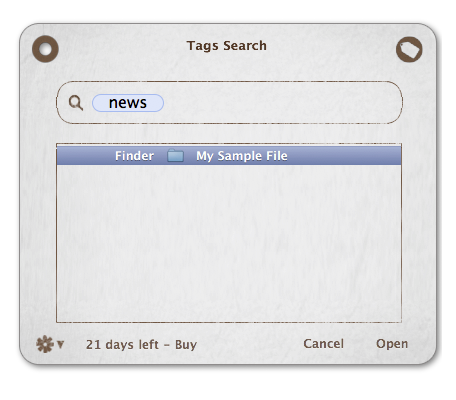
1. Press the Keyboard Shortcut CONTROL + SPACE twice to get into Search Mode
=> Tags first enters Tag Mode when invoked with the Keyboard Shortcut CONTROL + SPACE. In order to get to the gray Search Mode window press the Keyboard Shortcut CONTROL + SPACE once again, or press on magnifying glass button in the upper right
2. When in Search Mode enter the tag that you have previously applied. e.g. "news"
=> the found file will immediately show up below.
Search for a tagged file with Spotlight or in Application Search:
For some applications, the limitation of six buttons is bothersome. The application specific menus provide more actions, but these need at least two more clicks to be accessed.
Search for a tagged file with Spotlight or in Application Search:
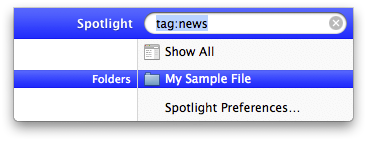
You can search for tags directly in Spotlight and most applications' search functions. Simply search with the prefix: "tag:"
For example tag:news will search for files that are tagged with the tag "news".
Removing Tags
You can remove tags as easily as you can add them. It works in much the same way.
Select the files where you wish to remove a tag and press the Tags Keyboard Shortcut CONTROL + SPACE. The yellow Tag Mode window will appear showing the Tags that are applied to those files. Simply remove the tags you want to remove, and press apply (or enter). If you would like to remove all instances of a tag, you can do so in the Tag Manager which is described below.
More Ways to launch Tags
Dock Icon:
You can also Drag file(s) on the Tags Dock icon to Tag them, or click on the Dock icon to activate Search Mode.
Menu Item:
Tagging can also be accessed through the Menu Item in the upper right corner of your screen.
The Tag Manager
The Tag Manager shows which Tags are currently applied to files on your Mac and how often they are being used. Double click a Tag to see the individual files in Finder. You can launch the Tag Manager from the menu, or by pressing the keyboard shortcut Command-T Screenshot
Rename Tag:
You can conveniently rename any of your tags with this function. Please be aware that if this tag has been used on a lot of files, this operation may take some time to complete.
Remove Tag:
You can conveniently remove any of your tags with this function. Please be aware that if this tag has been used on a lot of files, this operation may take some time to complete.
Open in Finder:
This opens a Finder window that shows the files that have a specific tag(s).
Create Smart Folder:
If you think that you will be working a lot with objects that are tagged in a specific way often, you can also go ahead and create a smart folder, so you can conveniently access this subset in the future.
Favorites:
You can mark certain Tags to be favorites. These favorite Tags are easily accessible within Tag and Search mode. ol.
Creating Smart Mailboxes
You can not only create Smart Folders in the Finder, but you can also create Smart Mailboxes in Mail. All you have to do is use the prefix "tag:" and apply the search over the entire message. The following example shows how to create a smart mailbox that contains all emails that are tagged with "projectxyz". Click to see Screenshot.
Importing Tags from other Applications
A lot of other applications that sport tagging functionality stored their tags as part of the spotlight comments in the following format "&tag". In order to easily use these previously assigned tags we have written an importer so that all your tags are preserved when you start using Tags from Gravity Applications:
Launch Tags Application
Then go to: File → Import Tags…
Follow the directions of the importer. It will search through all your files and allow you to import all the tags stored in the spotlight comments, as well as the color labels for you.
Preferences
The Tags preferences allow you to change advanced settings.
Enable Hotkey for Tagging:
This setting allows you to enable/disable and change the keyboard shortcut that is used to invoke Tags. The default setting is the Keyboard Shortcut: Control-Space
Auto-positioning the Tag Window:
Tags will autoposition its window to be at the top of the current active application when opened. If you prefer to have the Tags window at a fixed position on your screen, turn off this feature in the Tags preferences.
Use Flip Animation when switching mode:
This setting allows you to enable/disable the animation that is used by default when switching between Search Mode and Tag Mode. Turning off the animation makes tagging and searching for files quicker, which is especially helpful for people that use Tags very often.
Open Search when no selection is found:
When enabled Tags will automatically enter Search Mode when invoked and not capable of determining what file(s) previously had focus. When disabled, Tags will always go into Tag Mode first when invoked.
Extending Tags with Applescript and Automator
With Tags Applescript and Automator support you are able to include Tags in your own workflows. Check out the samples from the help menu. Help Menu > Automator and Script Examples...